สำหรับผู้ใช้งาน Microsoft 365 หากต้องการตั้งค่า MX ผ่าน Cloudflare สามารถทำได้โดยมีขั้นตอน ดังนี้
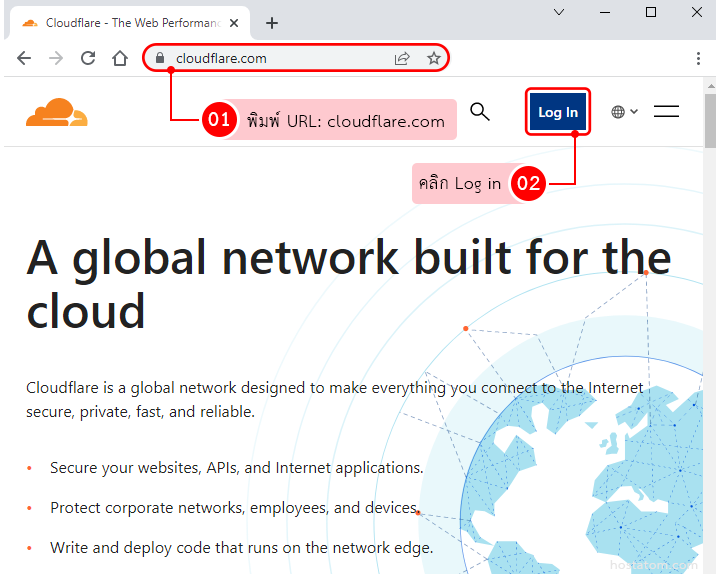
พิมพ์ URL: cloudflare.com => Log In (หากคุณยังไม่มีบัญชีก็ กดสมัคร ได้เลย)
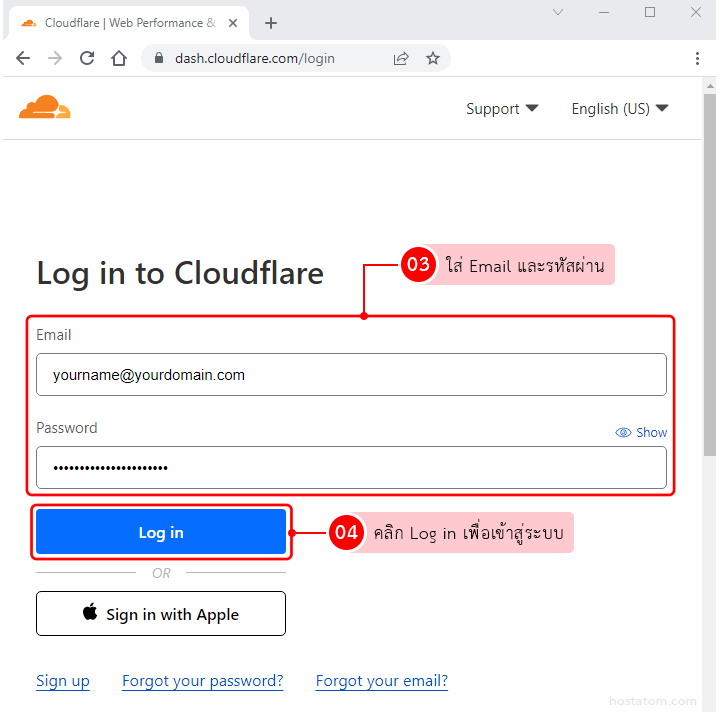
ใส่ บัญชีอีเมลที่ได้ลงทะเบียนไว้กับทาง Cloudflare และ Password จากนั้นคลิก Log in
คลิก Add site เพื่อทำการเพิ่มโดเมนลงบน Cloudflare

พิมพ์ชื่อโดเมนที่จะใช้งาน จากนั้นคลิกที่ปุ่ม Add site

Cloudflare จะมี Package ให้เลือก หลาย Package ซึ่งมีทั้งแบบเสียเงินและแบบฟรี ซึ่งในกรณีนี้จะใช้งานแบบฟรี ดังนั้นให้เลื่อนลงมาเรื่อยๆ จนถึง Package Free ให้คลิกที่ Free แล้วคลิกที่ปุ่ม Continue เพื่อดำเนินขั้นตอนต่อไป

ระบบจะมาหน้าที่ Review your DNS records จากนั้นให้ทำการลบค่าอีเมลเดิมของเก่าทิ้งไป จากนั้นคลิกที่ Add Record เพื่อเพิ่มค่า DNS ของ Microsoft 365 ลงไป

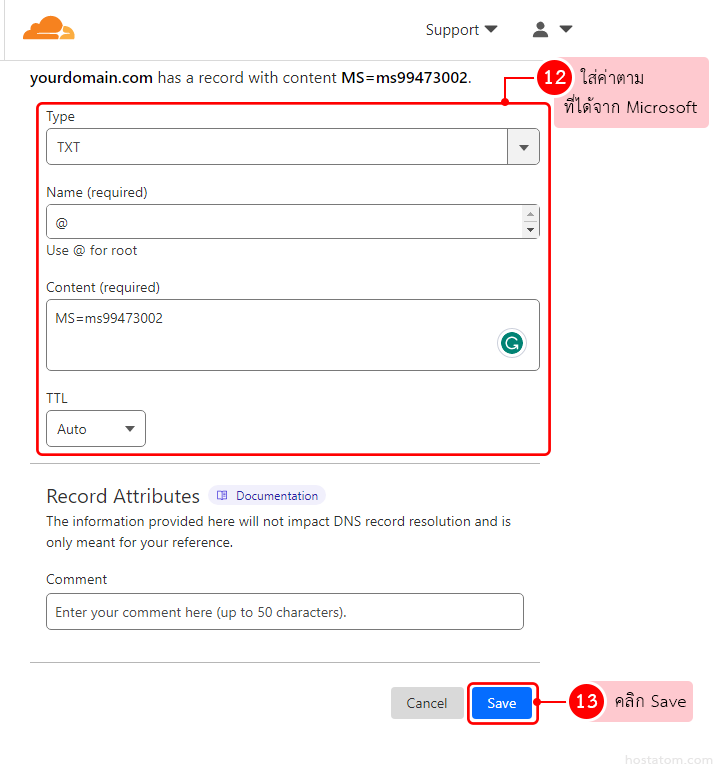
จากนั้นเพิ่มค่า MX และค่า TXT ของ Microsoft 365 โดยมีรายละเอียด ดังนี้
ค่า TXT record เพื่อ verify โดเมน
| Type | Name | Autimatic TTL | Content |
|---|---|---|---|
| TXT | @ | 30 minutes | MS=ms XXXXXXXX |
หมายเหตุ: ค่าใน Content เป็นเพียงค่าตัวอย่าง ซึ่งค่านี้คุณจะได้จากการตั้งค่าโดเมน
ค่า MX Record
| Type | Name | Mail Server | Priority | TTL |
|---|---|---|---|---|
| MX | @ | 1 | 30 minutes |
หมายเหตุ: ค่า domain-key ใน Mail Server เป็นเพียงค่าตัวอย่าง ซึ่งค่านี้คุณจะได้จากการตั้งค่าโดเมน
ค่า CNAME Record
| Type | Name | Target | TTL |
|---|---|---|---|
| CNAME | autodiscover | autodiscover.outlook.com | 30 minutes |
| CNAME | sip | sipdir.online.lync.com | 30 minutes |
| CNAME | lyncdiscover | webdir.online.lync.com | 30 minutes |
| CNAME | enterpriseregistration | enterpriseregistration.windows.net | 30 minutes |
| CNAME | enterpriseenrollment | enterpriseenrollment-s.manage.microsoft.com | 30 minutes |
| CNAME | msoid | clientconfig.microsoftonline-p.net | 30 minutes |
ค่า TXT Record สำหรับ SPF (มีเพื่อป้องกันอีเมลสแปม)
| Type | Name | TTL | Content |
|---|---|---|---|
| TXT | @ | 30 minutes | v=spf1 include:spf.protection.outlook.com -all |
ค่า SRV Record
| Type | Service | Ptotocol | Name | TTL | Priority | Weight | Port | Target |
|---|---|---|---|---|---|---|---|---|
| SRV | _sip | TLS | yourdomain.com | 30 minutes | 100 | 1 | 443 | sipfed.online.lync.com |
| SRV | _sipfederationtls | TCP | yourdomain.com | 30 minutes | 100 | 1 | 5061 | sipfed.online.lync.com |
ทำการเพิ่มค่า DNS ของ Microsoft 365 ด้านบนลงทีละค่า เมื่อใส่เสร็จค่านึงแล้วให้กดปุ่ม Save
จากนั้นคลิกที่ Add Record เพื่อเพิ่มค่าอื่นๆ ต่อไป ทำแบบนี้วนไปเรื่อยๆ จนครบ
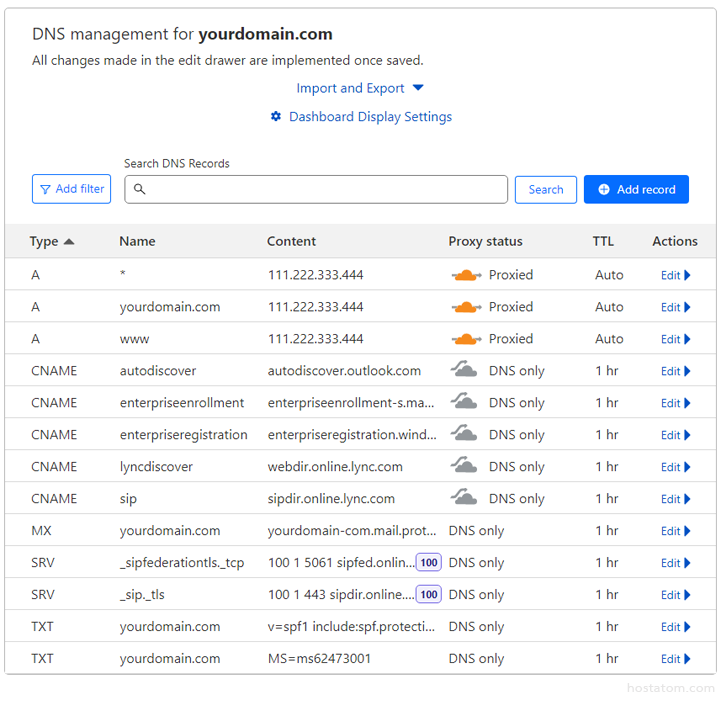
เมื่อตั้งค่าเรียบร้อยแล้ว จะแสดงรายละเอียด ดังภาพ
และเพื่อที่จะใช้งานบริการ Microsoft 365 ได้อย่างสมบูรณ์นั้นจะต้องไปตั้งค่า Nameserver ของโดเมนด้วยนะคะ
โดยให้เอาค่าที่ได้จาก Cloudflare ไปเปลี่ยนค่าของ Nameserver ที่คุณได้จดทะเบียนโดเมนไว้นะคะ
วิธีการเอาค่า nameserver จาก Cloudflare มีขั้นตอน ดังนี้
คลิกที่ Websites ระบบจะเข้าสู่หน้า home และจะแสดงรายชื่อโดเมนทั้งหมด
ให้คลิกที่โดเมนที่ต้องการดูค่า Nameserver

หน้า Overview ให้คลิกเลื่อนลงมาที่ข้อ 2. Replace with Cloudflare’s nameservers
แล้วทำการ Copy ค่า Nameserver 1 และ Nameserver 2 โดยคลิกที่คำว่า Click to copy

จากนั้นนำค่า nameserver ที่ Copy มาทั้ง 2 ค่าไปเปลี่ยนที่ผู้ให้บริการที่คุณจดทะเบียนโดเมนด้วย
แต่หากใครจดทะเบียนโดเมนกับทางโฮสอะตอม สามารถดูขั้นตอนการเปลี่ยน nameserver ได้ที่
วิธีเปลี่ยน Nameserver สำหรับโดเมนที่จดทะเบียนกับ hostatom
เมื่อเรียบร้อยแล้ว รอ DNS อัปเดตประมาณ 4-24 ชม. คุณก็จะสามารถใช้งานบริการกับทาง Microsoft 365 ได้นะคะ